
Welcome to the Honeywell T6 Pro Thermostat, a smart, user-friendly solution for controlling your home’s heating and cooling systems efficiently․ Designed with cutting-edge technology, this thermostat offers seamless smart connectivity, a backlit display, and advanced energy-saving features․ Perfect for modern homes, it ensures optimal comfort while reducing energy consumption․ This guide will walk you through installation, setup, and troubleshooting, helping you maximize its potential for a smarter living experience․
1․1 Overview of the T6 Pro Series
The Honeywell T6 Pro Series is a line of smart thermostats designed to provide advanced temperature control for residential HVAC systems․ This series includes models like the TH6220U2000 and TH6320U2008, offering compatibility with a wide range of heating and cooling systems․ The T6 Pro thermostats are known for their user-friendly interface, backlit display, and energy-saving features․ They support Wi-Fi connectivity, allowing users to control their home’s temperature remotely via a smartphone app․ The series also includes optional accessories like remote sensors for enhanced temperature accuracy․ This guide focuses on the T6 Pro installation process, ensuring a smooth setup and optimal performance for your smart thermostat․
1․2 Key Features and Benefits
The Honeywell T6 Pro Thermostat boasts an array of innovative features designed to enhance comfort and energy efficiency․ Its large, backlit display provides clear visibility, while the smart scheduling and geofencing capabilities allow for personalized temperature control based on your location․ The thermostat also supports voice control through Amazon Alexa and other smart home systems․ Energy usage reports and adaptive recovery features help optimize your HVAC system’s performance․ Additionally, the T6 Pro is compatible with optional remote sensors, ensuring consistent temperatures throughout your home․ These features not only improve convenience but also contribute to significant energy savings, making it a standout choice for modern households․
Pre-Installation Requirements and Compatibility
Before installing, verify system compatibility with your HVAC setup․ Ensure you have the correct tools, such as the UWP Mounting System, for a smooth installation process․
2․1 System Compatibility Check
Ensure the Honeywell T6 Pro is compatible with your HVAC system․ Verify the number of wires and system type (heat pump or conventional)․ For systems with only four wires, use the THP9045A1023 Wire Saver Module or THP9045A1098 C-wire adaptor to add a common wire․ Check if your system requires a K terminal for fan and compressor control․ Refer to the manual for specific wiring configurations and ensure compatibility with your heating and cooling setup․ Perform an HVAC system test to confirm proper operation before proceeding with installation․ This step ensures a seamless integration of the thermostat with your existing system․
2․2 Tools and Materials Needed
To ensure a smooth installation, gather the necessary tools and materials․ You will need a screwdriver for removing the old thermostat and mounting the new one․ A drill may be required for wall anchors if the UWP mounting system is used․ Additionally, have wire strippers handy for preparing connections․ If your system lacks a common wire, prepare the THP9045A1023 Wire Saver Module or THP9045A1098 C-wire adaptor․ Ensure you have the Honeywell T6 Pro thermostat, its UWP mounting plate, and any optional cover plates․ Refer to the manual for specific wiring requirements and system-specific adapters․ Organize these tools and materials beforehand to streamline the installation process․

Installation Process
Begin with unboxing and initial checks, followed by mounting the thermostat using the UWP system․ Proceed with wiring connections, ensuring compatibility and correctness․ Refer to the manual for detailed step-by-step guidance to complete the installation successfully․
3․1 Unboxing and Initial Checks
Start by carefully unboxing the Honeywell T6 Pro Thermostat, ensuring all components are included, such as the thermostat, UWP mounting system, and optional cover plate․ Verify that no damage occurred during shipping․ Before proceeding, review the installation manual to familiarize yourself with the process and safety precautions․ Next, prepare the wall by placing the wall anchors from the UWP mounting system․ Finally, ensure the HVAC system is powered off at the circuit breaker to avoid any electrical hazards during installation․ These initial steps are crucial for a smooth and safe setup process․
3․2 Mounting the Thermostat
After unboxing, locate the UWP mounting system and wall anchors․ Insert the wall anchors into the drilled holes and align the UWP with them․ Gently pull the wires through the wiring hole on the UWP․ Place the thermostat onto the UWP, ensuring it clicks securely into position․ Tighten the mounting screws to hold the device firmly in place․ Use a leveling tool to ensure the thermostat is straight and properly aligned․ Double-check that all wires are securely connected and no excess wire is visible․ Once mounted, the thermostat should sit flush against the wall for a clean, professional appearance․
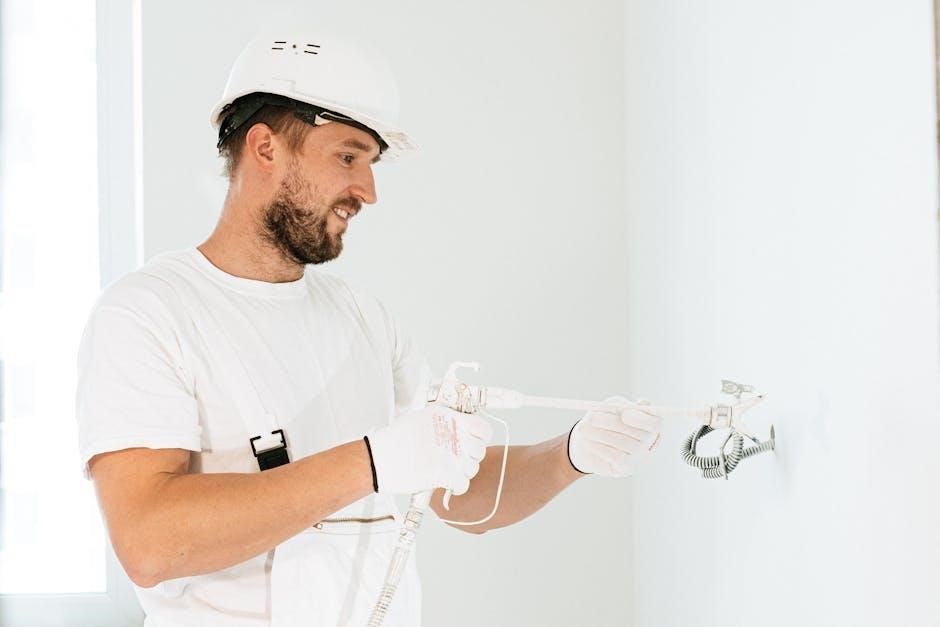
3․3 Wiring and Connections
Begin by connecting the wires to the appropriate terminals on the thermostat, ensuring secure and correct connections․ For systems with only four wires, use the THP9045A1023 Wire Saver Module or the THP9045A1098 C-wire adaptor to add a common wire․ Connect the wires to the corresponding terminals (e․g․, R, W, Y, G, C) as per your HVAC system’s configuration․ Use the K terminal to control the fan and compressor if necessary․ Refer to the wiring diagram in the manual for specific terminal designations․ Once all connections are made, tighten the terminal screws firmly․ Finally, test the system to ensure proper operation and functionality of all connected components․

Advanced Setup and Configuration
Connect your Honeywell T6 Pro to Wi-Fi for remote control via the Honeywell Home app․ Set up schedules, preferences, and advanced settings like geofencing through the app or thermostat menu․ Access Installer Setup Options (ISU) for detailed system customization, ensuring optimal performance and energy efficiency tailored to your needs․
4․1 Connecting to Wi-Fi
To connect your Honeywell T6 Pro Thermostat to Wi-Fi, navigate to the network settings in the thermostat menu․ Select your home’s Wi-Fi network from the list and enter the password using the touchscreen interface․ Ensure your router is within range for a stable connection․ Once connected, the thermostat will display a confirmation message․ You can now control your thermostat remotely using the Honeywell Home app․ The app allows you to adjust settings, view energy usage, and receive alerts․ A strong internet connection is essential for smart features like geofencing and voice control through Amazon Alexa or Google Assistant․
4․2 Setting Up Schedules and Preferences
Setting up schedules and preferences on your Honeywell T6 Pro Thermostat allows you to customize your comfort and energy usage․ Begin by navigating to the “Schedules” section in the menu․ Create a daily schedule by setting temperature preferences for different times of the day, such as wake, leave, return, and sleep․ Adjust the temperature range to suit your needs, ensuring energy efficiency․ You can also enable geofencing, which uses your smartphone’s location to automatically adjust temperatures when you leave or arrive home․ Additionally, set preferences like temperature limits to prevent extreme heating or cooling․ For advanced control, enable remote sensors to manage temperatures in specific zones or rooms․

Troubleshooting Common Issues
Common issues with the Honeywell T6 Pro Thermostat include connectivity problems, display malfunctions, or unresponsiveness․ Always check wiring connections and ensure proper power supply․ Resetting the thermostat or reconnecting to Wi-Fi often resolves connectivity issues․ For persistent problems, refer to the troubleshooting section in the manual or contact a certified HVAC technician for assistance․
5․1 Common Installation Mistakes
Common installation mistakes with the Honeywell T6 Pro Thermostat often involve improper wiring connections or misconfiguration of system settings․ One frequent error is incorrect use of the K terminal, which can disrupt fan and compressor control․ Additionally, some users overlook the need for a C-wire, leading to power issues․ Improper mounting of the UWP system or failing to level the thermostat can cause inaccurate temperature readings․ Another mistake is not verifying system compatibility before installation, which may result in operational issues․ Always refer to the wiring diagrams and ISU settings in the manual to ensure correct installation and configuration․
5․2 Solving Connectivity Problems
To resolve connectivity issues with your Honeywell T6 Pro Thermostat, ensure it is properly powered and connected to your Wi-Fi network․ Check your router’s status and restart it if necessary․ Verify that the thermostat’s firmware is up to date, as outdated software can cause connection problems․ If issues persist, reset the thermostat to factory settings and reconnect it through the Honeywell app․ Ensure the router is within range and there are no physical obstructions․ If these steps fail, contact Honeywell support for further assistance or refer to the troubleshooting section in the installation manual for additional guidance․
The Honeywell T6 Pro Thermostat offers a seamless blend of smart functionality and energy efficiency, making it an excellent choice for modern homes․ By following the installation guide and troubleshooting tips, users can ensure a smooth setup and optimal performance․ With its intuitive interface and advanced features, this thermostat provides comfort and convenience while helping to reduce energy consumption․ For any unresolved issues, consulting the manual or reaching out to Honeywell support is recommended․ Enjoy the benefits of a smarter, more efficient heating and cooling system with the Honeywell T6 Pro Thermostat․